On Azure

The Azure Kubernetes Service (AKS) is one of the Azure services used for deploying, managing, and scaling any distributed and containerized workloads. Here we can provision the AKS cluster on Azure from the ground up and using an automated way (infra-as-code) using terraform and then deploy the DIGIT-iFIX Services config-as-code using Helm.

This quickstart assumes a basic understanding of Kubernetes concepts. For more information, see Kubernetes core concepts for Azure Kubernetes Service (AKS).

If you don't have an Azure subscription, create a free account before you begin.

Pre-requisites

  • Use the Bash environment in Azure Cloud Shell.

  • If you prefer, install the Azure CLI to run CLI reference commands.

    • If you're using a local installation, sign in to the Azure CLI by using the az login command. To finish the authentication process, follow the steps displayed in your terminal. For additional sign-in options, see Sign in with the Azure CLI.

    • When you're prompted, install Azure CLI extensions on first use. For more information about extensions, see Use extensions with the Azure CLI.

    • Run az version to find the version and dependent libraries that are installed. To upgrade to the latest version, run az upgrade.

  • This article requires version 2.0.64 or greater of the Azure CLI. If using Azure Cloud Shell, the latest version is already installed.

  • The identity you are using to create your cluster has the appropriate minimum permissions. For more details on access and identity for AKS, see Access and identity options for Azure Kubernetes Service (AKS).

  • Install kubectl on your local machine that helps you interact with the kubernetes cluster

  • Install Helm that helps you package the services along with the configurations, envs, secrets, etc into a kubernetes manifests

  • Install terraform version (0.14.10) for the Infra-as-code (IaC) to provision cloud resources as code and with desired resource graph and also it helps to destroy the cluster at one go.

Note: Run the commands as administrator if you plan to run the commands in this quickstart locally instead of in Azure Cloud Shell.

AKS Architecture

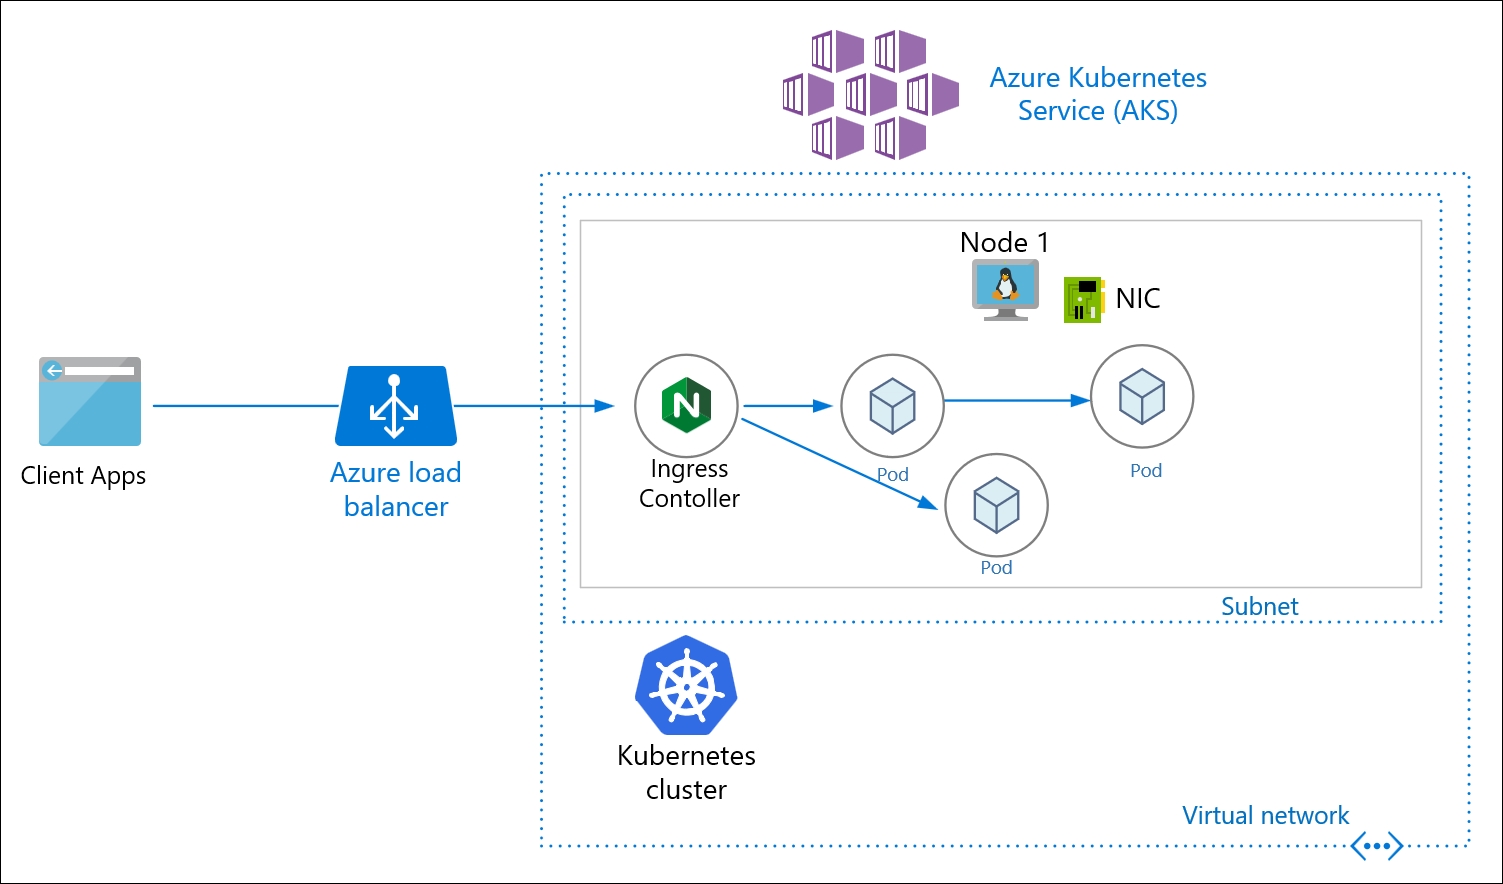
Before we provision the cloud resources, we need to understand and be sure about what resources need to be provisioned by terraform to deploy DIGIT. The following picture shows the various key components. (AKS, Worker Nodes, Postgres DB, Volumes, Load Balancer)

AKS Architecture For iFIX Setup

Considering the above deployment architecture, the following is the resource graph that we are going to provision using terraform in a standard way so that every time and for every env, it'll have the same infra.

  • AKS Azure (Kubernetes Service Master)

  • Work node group (VMs with the estimated number of vCPUs, Memory

  • Volumes (persistent volumes)

  • PostGres Database

  • Virtual Network

  • Users to access, deploy and read-only

Understand the Resource Graph In Terraform Script

  • Ideally, one would write the terraform script from the scratch using this doc.

  • Here we have already written the terraform script that provisions the production-grade DIGIT Infra and can be customized with the specified configuration.

  • Let's clone the iFix-DevOps GitHub repo where the terraform script to provision the AKS cluster is available and below is the structure of the files.

git clone --branch release https://github.com/misdwss/iFix-DevOps.git
cd iFix-DevOps/infra-as-code/terraform


└── modules
    ├── db
    │   └── azure
    │       ├── main.tf
    │       ├── outputs.tf
    │       └── variables.tf
    ├── kubernetes
    │   └── azure
    │       ├── main.tf
    │       ├── outputs.tf
    │       └── variables.tf
    ├── node-pool
    │   └── azure
    │       ├── main.tf
    │       ├── outputs.tf
    │       └── variables.tf
    └── storage
        └── azure
            ├── main.tf
            ├── outputs.tf
            └── variables.tf

The following main.tf contains the detailed resource definitions that need to be provisioned, please have a look at it.

Dir: iFix-DevOps/Infra-as-code/terraform/aks-ifix-dev

main.tf

provider "azurerm" {
  # whilst the `version` attribute is optional, we recommend pinning to a given version of the Provider
  version = "~>2.0"
  features {}
  subscription_id  = "71f67180-c7fb-43dd-988a-e9f9e3135adc"
  tenant_id        = "b36b0fbe-cea1-4178-8664-ba81a1e51765" 
  client_id = "${var.client_id}"
  client_secret = "${var.client_secret}"
}

resource "azurerm_resource_group" "resource_group" {
  name     = "${var.resource_group}"
  location = "${var.location}"
  tags = {
     environment = "${var.environment}"
  }
}

module "kubernetes" {
  source = "../modules/kubernetes/azure"
  environment = "${var.environment}"
  name = "${var.environment}"
  ssh_public_key = "~/.ssh/id_rsa.pub"
  location = "${azurerm_resource_group.resource_group.location}"
  resource_group = "${azurerm_resource_group.resource_group.name}"
  client_id = "${var.client_id}"
  client_secret = "${var.client_secret}"
  nodes = "1"
  vm_size = "Standard_DS2_v2"
}

module "node-group" {  
  for_each = toset(["ifix"])
  source = "../modules/node-pool/azure"
  node_group_name     = "${each.key}ng"
  cluster_id          = "${module.kubernetes.cluster_id}"
  vm_size             = "Standard_D4ds_v4"
  nodes          = 2
}

module "zookeeper" {
  source = "../modules/storage/azure"
  environment = "${var.environment}"
  itemCount = "3"
  disk_prefix = "zookeeper"
  location = "${azurerm_resource_group.resource_group.location}"
  resource_group = "${module.kubernetes.node_resource_group}"
  storage_sku = "Premium_LRS"
  disk_size_gb = "5"
  
}

module "kafka" {
  source = "../modules/storage/azure"
  environment = "${var.environment}"
  itemCount = "3"
  disk_prefix = "kafka"
  location = "${azurerm_resource_group.resource_group.location}"
  resource_group = "${module.kubernetes.node_resource_group}"
  storage_sku = "Standard_LRS"
  disk_size_gb = "100"
  
}
module "es-master" {
  source = "../modules/storage/azure"
  environment = "${var.environment}"
  itemCount = "3"
  disk_prefix = "es-master"
  location = "${azurerm_resource_group.resource_group.location}"
  resource_group = "${module.kubernetes.node_resource_group}"
  storage_sku = "Premium_LRS"
  disk_size_gb = "2"
  
}
module "es-data-v1" {
  source = "../modules/storage/azure"
  environment = "${var.environment}"
  itemCount = "3"
  disk_prefix = "es-data-v1"
  location = "${azurerm_resource_group.resource_group.location}"
  resource_group = "${module.kubernetes.node_resource_group}"
  storage_sku = "Premium_LRS"
  disk_size_gb = "100"
  
}

module "kafka-ifix" {
  source = "../modules/storage/azure"
  environment = "${var.environment}"
  itemCount = "3"
  disk_prefix = "kafka-ifix"
  location = "${azurerm_resource_group.resource_group.location}"
  resource_group = "${module.kubernetes.node_resource_group}"
  storage_sku = "Standard_LRS"
  disk_size_gb = "100"
  
}

module "zookeeper-ifix" {
  source = "../modules/storage/azure"
  environment = "${var.environment}"
  itemCount = "3"
  disk_prefix = "zookeeper-ifix"
  location = "${azurerm_resource_group.resource_group.location}"
  resource_group = "${module.kubernetes.node_resource_group}"
  storage_sku = "Premium_LRS"
  disk_size_gb = "5"
  
}

module "postgres-db" {
  source = "../modules/storage/azure"
  environment = "${var.environment}"
  itemCount = "2"
  disk_prefix = "postgres-db"
  location = "${azurerm_resource_group.resource_group.location}"
  resource_group = "${module.kubernetes.node_resource_group}"
  storage_sku = "Premium_LRS"
  disk_size_gb = "20"
  
}

Custom Variables/Configurations

You can define your configurations in variables.tf and provide the environment-specific cloud requirements so that using the same terraform template you can customize the configurations.

├── aks-iFix-dev
│   ├── main.tf 
│   ├── outputs.tf
│   ├── providers.tf
│   ├── remote-state
│   │   └── main.tf
│   └── variables.tf

Following are the values that you need to mention in the following files, the blank ones will be prompted for inputs while execution.

variables.tf

## Add Cluster Name
variable "cluster_name" {
  default = "<Desired Cluster name>"  #eg: my-digit-aka
}
## Environment Name
variable "environment" {
    default = "<Desired Environment name>"  #eg: ifix-qa
}
## Resource Group Name
variable "resource_group" {
    default = "<Desired Resource Group name>"  #eg: ifix-qa
}
## Location Name
variable "location" {
    default = "<Desired Location name>"  #eg: southeastAsia
}

​Run Terraform

Now that we know what the terraform script does, the resources graph that it provisions and what custom values should be given with respect to your env.

Let's begin to run the terraform scripts to provision infra required to Deploy DIGIT on AZ.

  1. First CD into the following directory and run the following command 1-by-1 and watch the output closely.

cd DIGIT-DevOps/infra-as-code/terraform/aks-ifix-dev
terraform init
terraform plan
terraform apply

Upon Successful execution following resources gets created which can be verified by the command "terraform output"

  • Network: Virtual Network.

  • AKS cluster: with nodepool(s), master(s) & worker node(s).

  • Storage(s): for es-master, es-data-v1, es-master-infra, es-data-infra-v1, zookeeper, kafka, kafka-infra.

Connect To The Cluster

To manage a Kubernetes cluster, use the Kubernetes command-line client, kubectl. kubectl is already installed if you use Azure Cloud Shell.

  1. Install kubectl locally using the az aks install-cli command:

    az aks install-cli
  2. Configure kubectl to connect to your Kubernetes cluster using the az aks get-credentials command. The following command:

    • Downloads credentials and configures the Kubernetes CLI to use them.

    • Uses ~/.kube/config, the default location for the Kubernetes configuration file. Specify a different location for your Kubernetes configuration file using --file.

    az aks get-credentials --resource-group myResourceGroup --name myAKSClusteVerify the connection to your cluster using the  command. This command returns a list of the cluster nodes.

3. Finally, Verify that you are able to connect to the cluster by running the following command

kubectl config use-context <your cluster name>

kubectl get nodes

NAME                       STATUS   ROLES   AGE     VERSION
aks-nodepool1-31718369-0   Ready    agent   6m44s   v1.12.8 

Whola! All set and now you can go with Deploy Product.

Last updated

All content on this page by eGov Foundation is licensed under a Creative Commons Attribution 4.0 International License.